Set up your first Kotlin Multiplatform project for Android and iOS

I’m preparing a talk about Kotlin Multiplatform and as I was gathering feedback about the typical challenges that people had on their projects — I’ve noticed that the one that demotivates people the most is how to set up their project.
I understand you!
It happened to me recently with a finished project in mobile that when I wanted to add a JS module I spent more time that I want to admit to just having it running.
Don’t forget that Kotlin Multiplatform is still experimental and the project itself is gigantic — we’ve got the chance here to have a common library across almost all platforms! So, when we deal with all these configurations problems will arise. If you’re stuck with one, the best way is to reach the community and you can easily do that on Kotlin’s slack (you’ve got people from JetBrains itself which is really handy!)
Well, let’s set up and run our first Kotlin Multiplatform project for Android and iOS!
Set up your Kotlin Multiplatform project
IDE’s aren’t known as the most lightweight software so when thinking in Multiplatform projects we always want to keep them at a minimum. I usually only use IntelliJ IDEA for the shared modules and Android and typically Xcode for iOS development.
The tools that I’m using are:
Operating System
macOS Mojave Version 10.14.4
IntelliJ IDEA
IntelliJ IDEA 2019.1.3 (Community Edition)
JRE: 1.8.0_202-release-1483-b58 x86_64
JVM: OpenJDK 64-Bit Server VM by JetBrains s.r.o
Android Studio
Although, I’ve got Android Studio installed (v3.4.1), for multiplatform projects I usually only use IntelliJ.
Xcode
Version 10.2.1 (10E1001)
Note: IntelliJ also has its own IDE for iOS — AppCode which has a free 30-day trial. Nevertheless, since Xcode is free and I’m already familiar with it I’ve decided to keep using it.
How to start?
- Open IntelliJ IDEA CE and select “Create New Project”
- Select “Mobile Android/iOS | Gradle” and hit “Next”
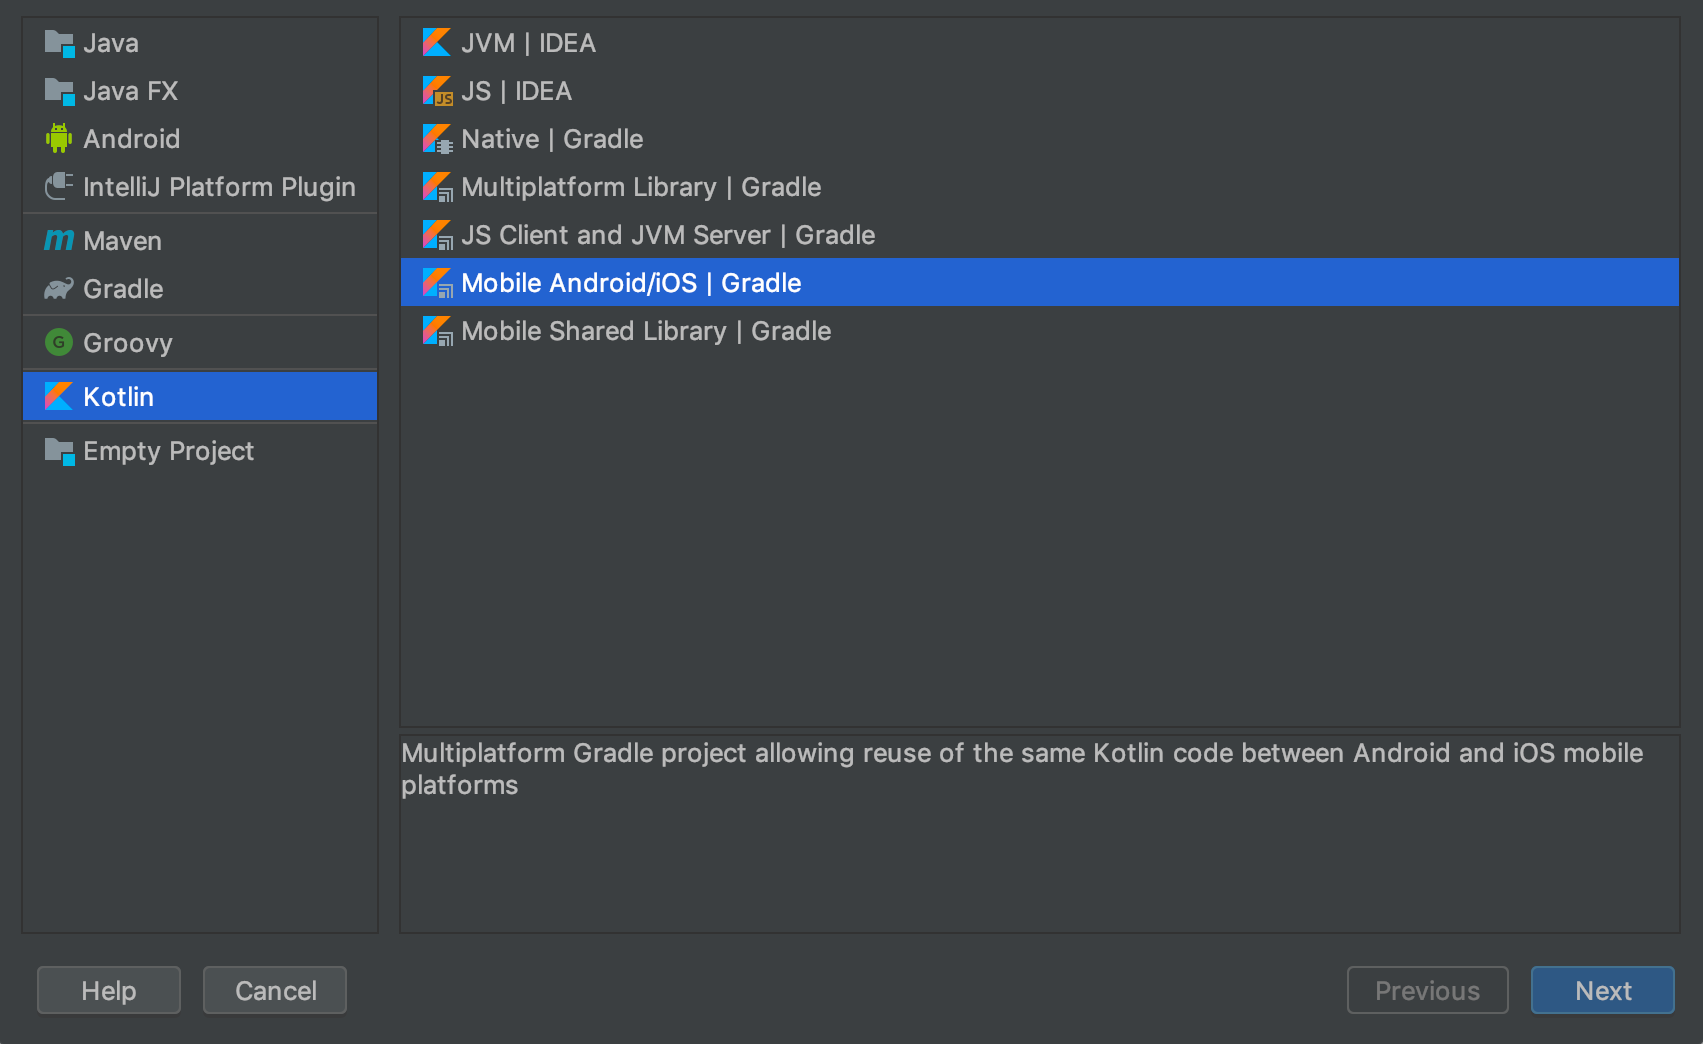
Create a new android/ iOS project on IntelliJ - Select “Use auto-import”
- Write your “Project name” and select your “Project location”
- Click on “Finish”
-
The project will start to sync and fetch its dependencies. Most certainly this will fail with a similar error:
The SDK directory '/Users/$(whoami)/GitHub/commitporto/PleaseSpecifyAndroidSdkPathHere'
does not exist.
Please fix the 'sdk.dir' properssty in the local.properties file.se
Open Filess
This can easily be fixed by opening the file local.properties and update the path for the
sdk.dir.ndk.dir=/Users/$(whoami)/Library/Android/sdk/ndk-bundle sdk.dir=/Users/$(whoami)/Library/Android/sdkI’ve also added the
ndk.diralthough this is only necessary if you have code in C/C++ that you want to access from Android. - In order to re-start the synchronization, go to the Gradle side tab and click on the refresh icon.
- Your project should now sync and afterward, you should see a couple of ticks ✔️on the tasks. If you look to your project structure you don’t have a
gradlew file, so let’s add it! - Go to the terminal (you can do this directly from IntelliJ by going to the Terminal tab on the bottom bar) and write:
gradle wrapper
If you open your project structure and navigate to app/src/ you can see a couple of modules added:
-- src
    |
    -- commonMain (your shared module)
    -- commonTest (your shared module tests)
    -- iOSMain    (your iOS code)
    -- iOSTest    (your iOS code tests)
    -- main       (your android code)
    -- test   (your android code tests)
This is not required but I feel a bit strange looking at the structure and seeing the modules main e test for Android, so I’ve decided to rename them to
-- src
    |
    -- ...
    -- androidMain
    -- androidTest
You also need to update your app/build.gradle to face these changes:
android {
  compileSdkVersion 28
  ...

  sourceSets {
    main {
      manifest.srcFile 'src/androidMain/AndroidManifest.xml'
      java.srcDirs = ['src/androidMain/java']
      res.srcDirs = ['src/androidMain/res']
    }
  }
}
Now that we’ve got our project all set up — let’s compile it to each platform.
Compile target: android
You can compile the project directly to Android by:
- Going to “Add Configuration…” on the top bar
- Click on “+” sign and “Add New Configuration” of an “Android App”
- Select the correct module (it should be “app”)
- And add a name like “android” just so it won’t use the default one that is “unnamed”

Android configuration - Select “OK” and the window will close
- Select the run button (green triangle) on the top
- And either select your phone or create a new virtual device so you can install your newly compiled Android app there!
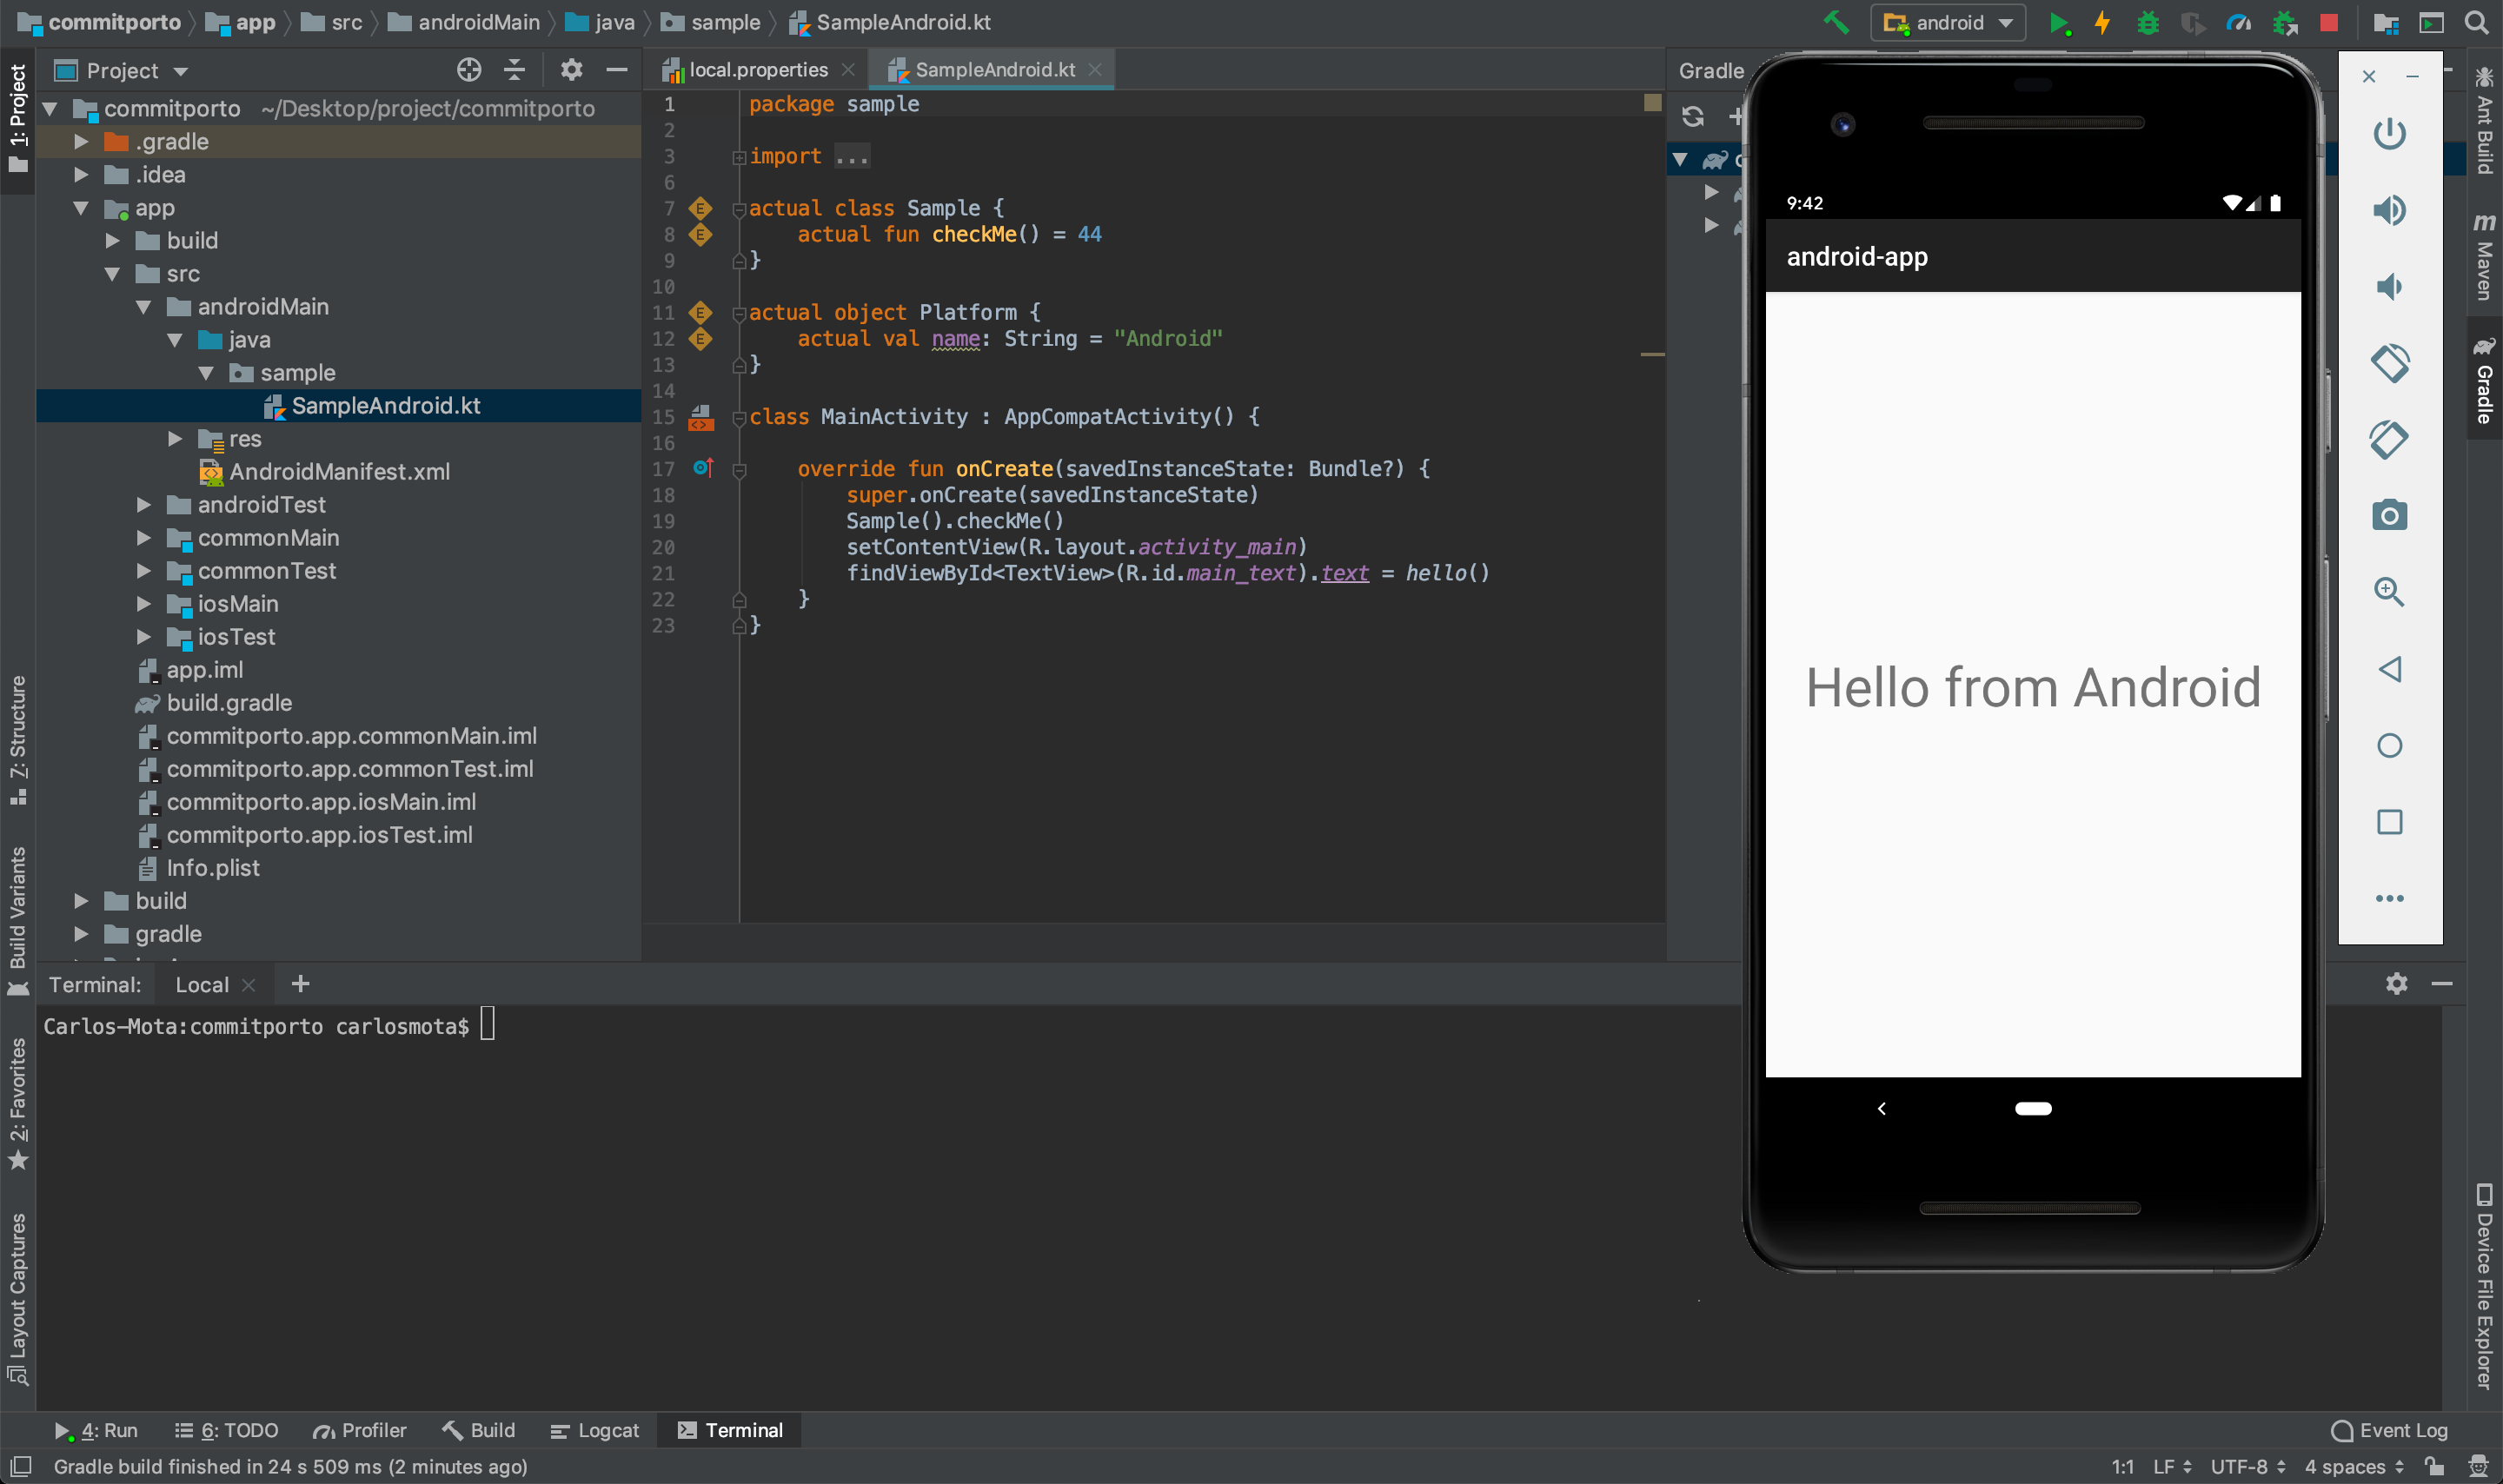
The Android application running
Compile target: iOS
For iOS we need to make a few more changes. Open the app/build.gradle file again and if you scroll to the button you should see a task named copyFramework that, as the name says, will copy the Framework created during compile time. You should update your code to:
task copyFramework {
  def type = project.findProperty('kotlin.build.type') ?: 'DEBUG'
  def target = project.findProperty('kotlin.target') ?: 'ios'
  dependsOn kotlin.targets."$target".compilations.main.linkTaskName('FRAMEWORK', type)
}
Since we’ve changed how it’s copied we also need to update the type of output, for that scroll to the kotlin section (still on app/build.gradle) and change to:
kotlin {
  android("android")
  // This is for iPhone emulator
  // Switch here to iosArm64 (or iosArm32) to build library for iPhone device
  iosX64("ios") {
    compilations.main.outputKinds("framework")
  }
  ...
}
You can now import this project into Xcode.
- On Xcode select “Open another project” and navigate to your project folder
- If you look at the project’ root you should have a folder called iOSApp with an iOSApp.xcodeproj file inside — select it and click on “Open”
After opening the project if you try to run it (white arrow on the top bar) after a few seconds you should see an error mentioning that it wasn’t possible to compile the project because it couldn’t find the app module:
Swift Compiler Error

No such module 'app' ViewController.swift
If you now open the ViewController.swift (that’s inside iOSApp/iOSApp/ViewController.swift) you’ll see the same message in red over the module import. This corresponds to the default shared module that IntelliJ created when we start this new project — and you can see it being used on the viewDidLoad function to set the text for this view label:
label.text = Proxy().proxyHello()
- First, you need to change this import from app to main since the module is compiled by default under this nomenclature.
- You need to click on the iOSApp file on the project hierarchy (it should the root) and on that opened screen click on iOSApp under “Targets” and select “Build Phases”
- On “Build Phases” click on the “+” sign and select “New Run Script Phase”
- Drag this new phase to be just after “Target Dependencies”
- Add the following script to the box below “Shell”:
cd "$SRCROOT/.."
./gradlew :app:copyFramework -PXCODE_CONFIGURATION=${CONFIGURATION}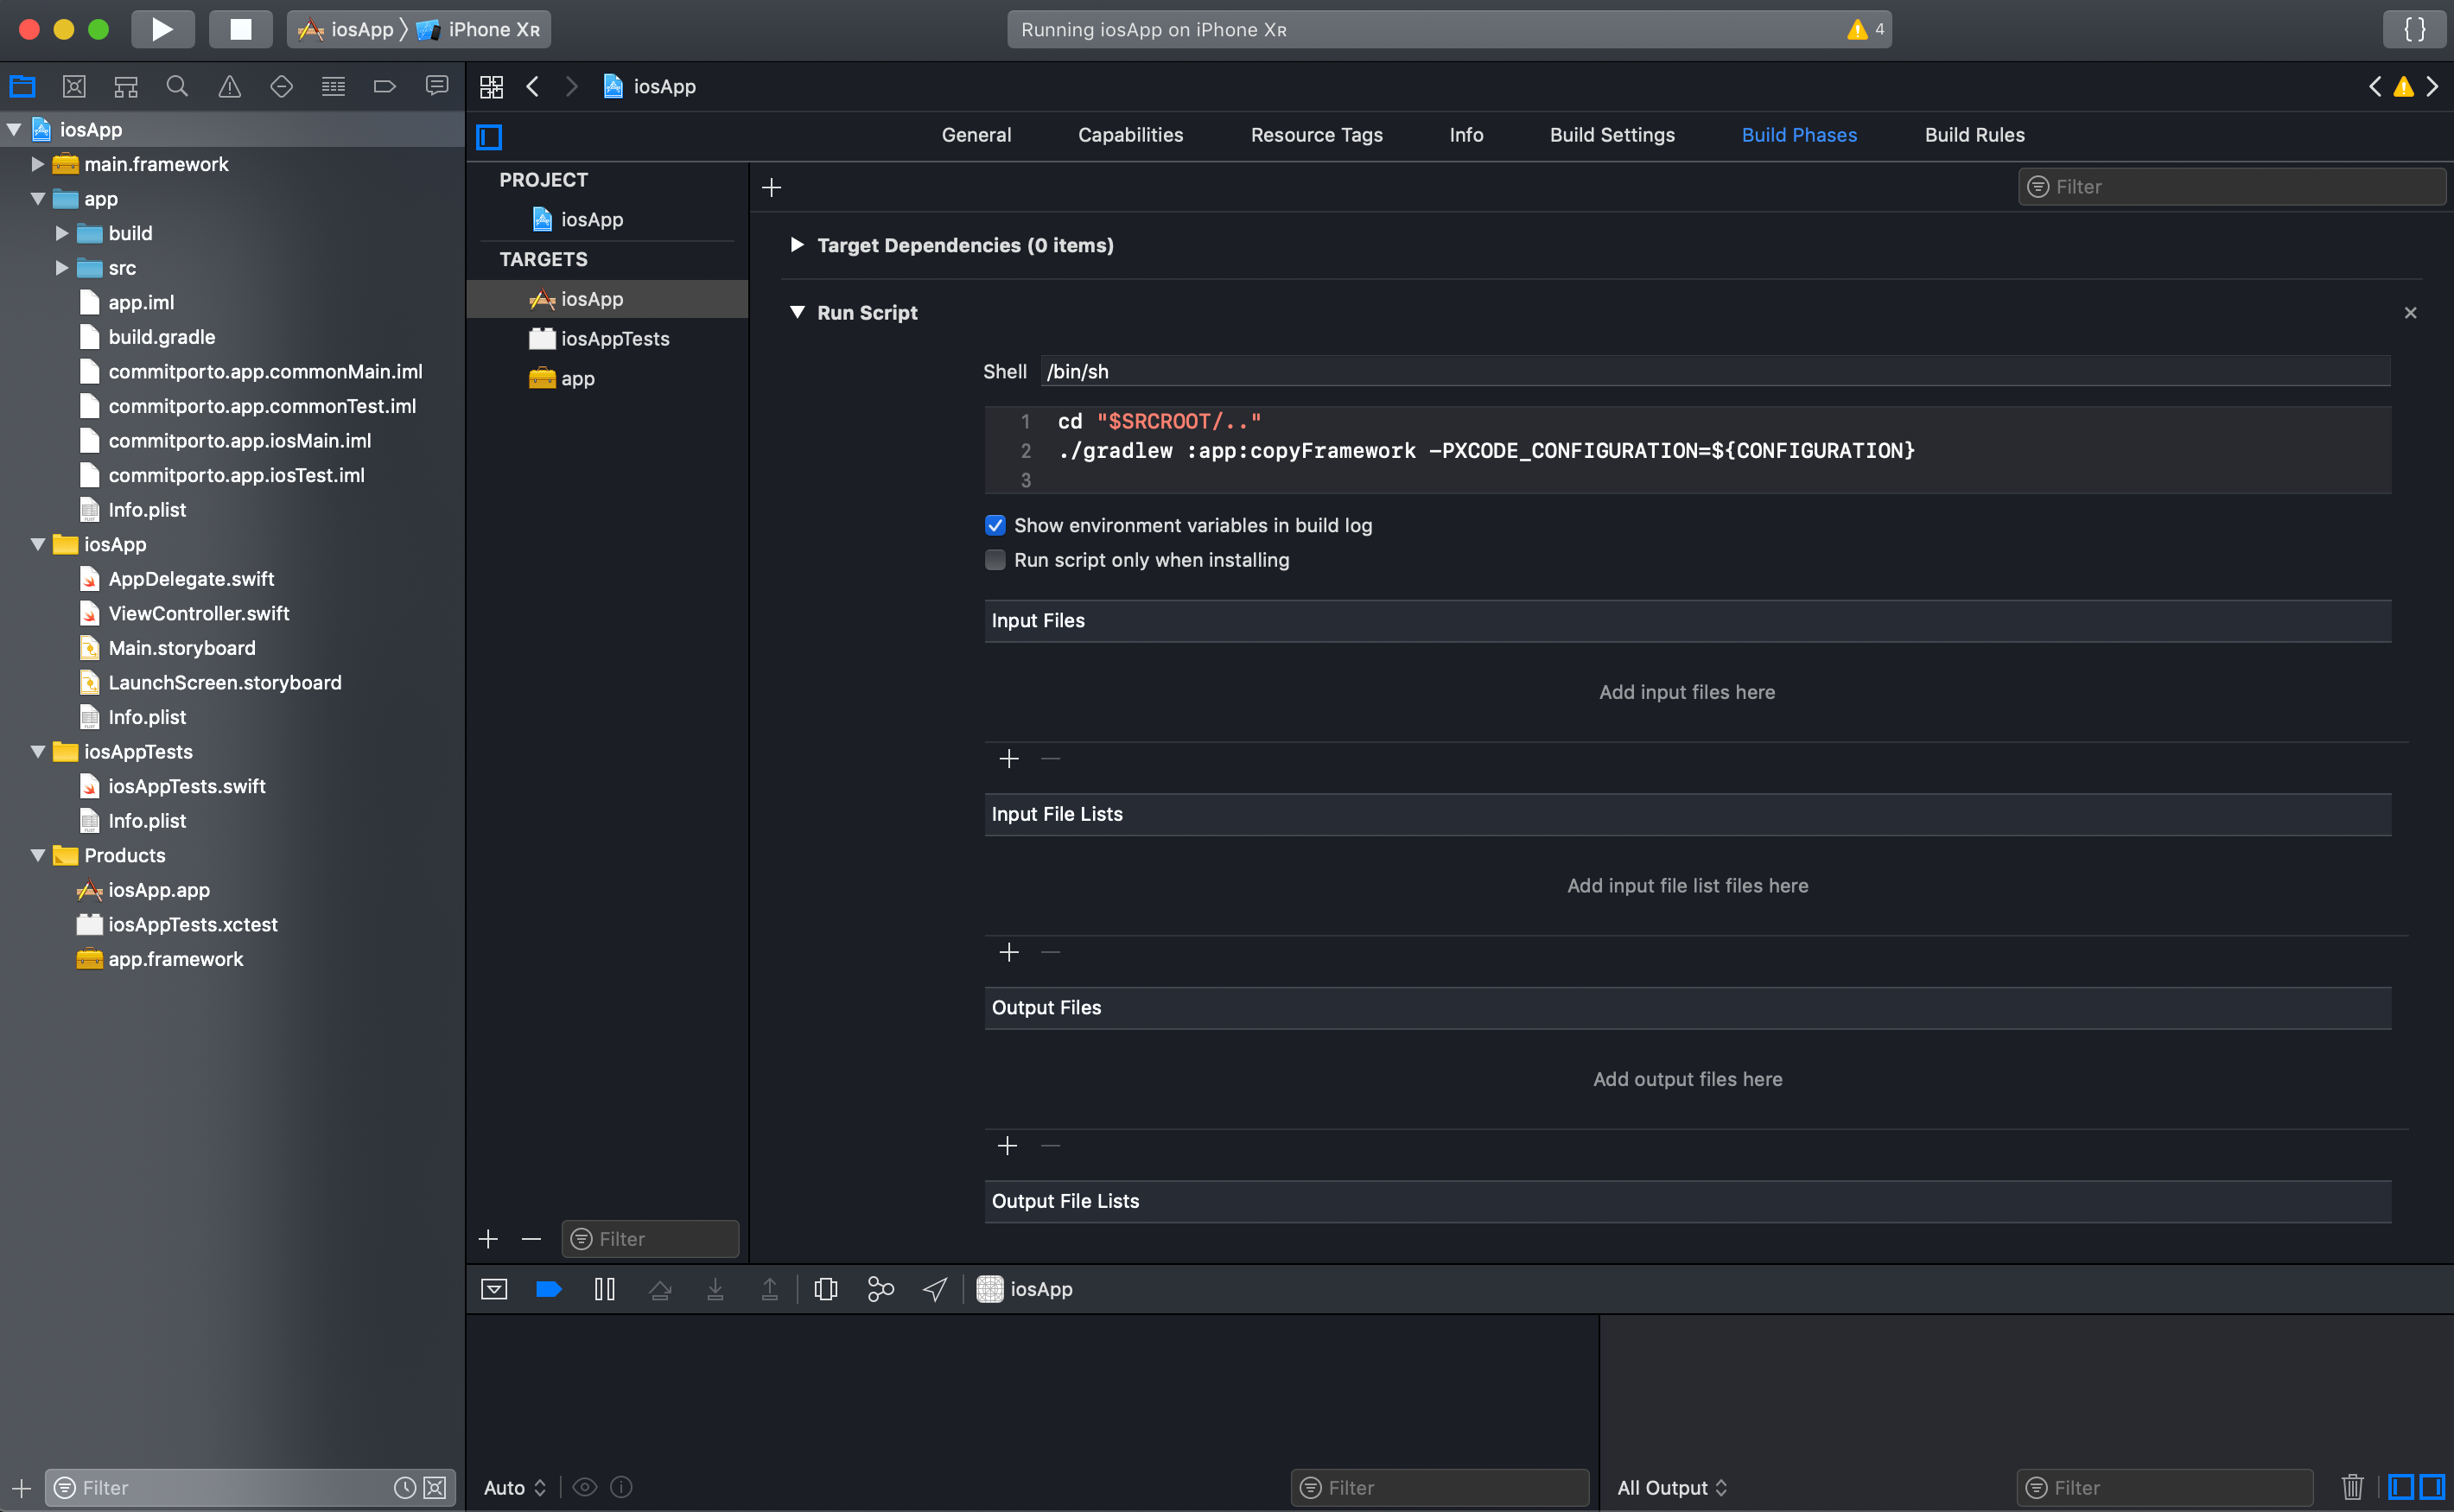
Run script configuration under Build Phases - Now go to “Build Settings” and on the search bar write “search”
- You should see a header that says “Search Paths” and a section named “Framework Search Paths”, click here and a small new window should be displayed
$(SRCROOT)/../app/build/bin/ios/mainDebugFramework - To finish you need to “General” tab and scroll to the bottom of the screen.
- You should see an “Embedded Binaries” section. Click on the “-“ sign in order to remove the app.framework that was automatically added.
- To add our shared module we need to do it manually. So this time click on the “+” sign and then on “Add Other…”
- Navigate to your project root folder and then to app/build/bin/ios/mainDebugFramework/main.framework select main.Framework and click on “Open” so it can be added to the project.
- Click on “Finish”
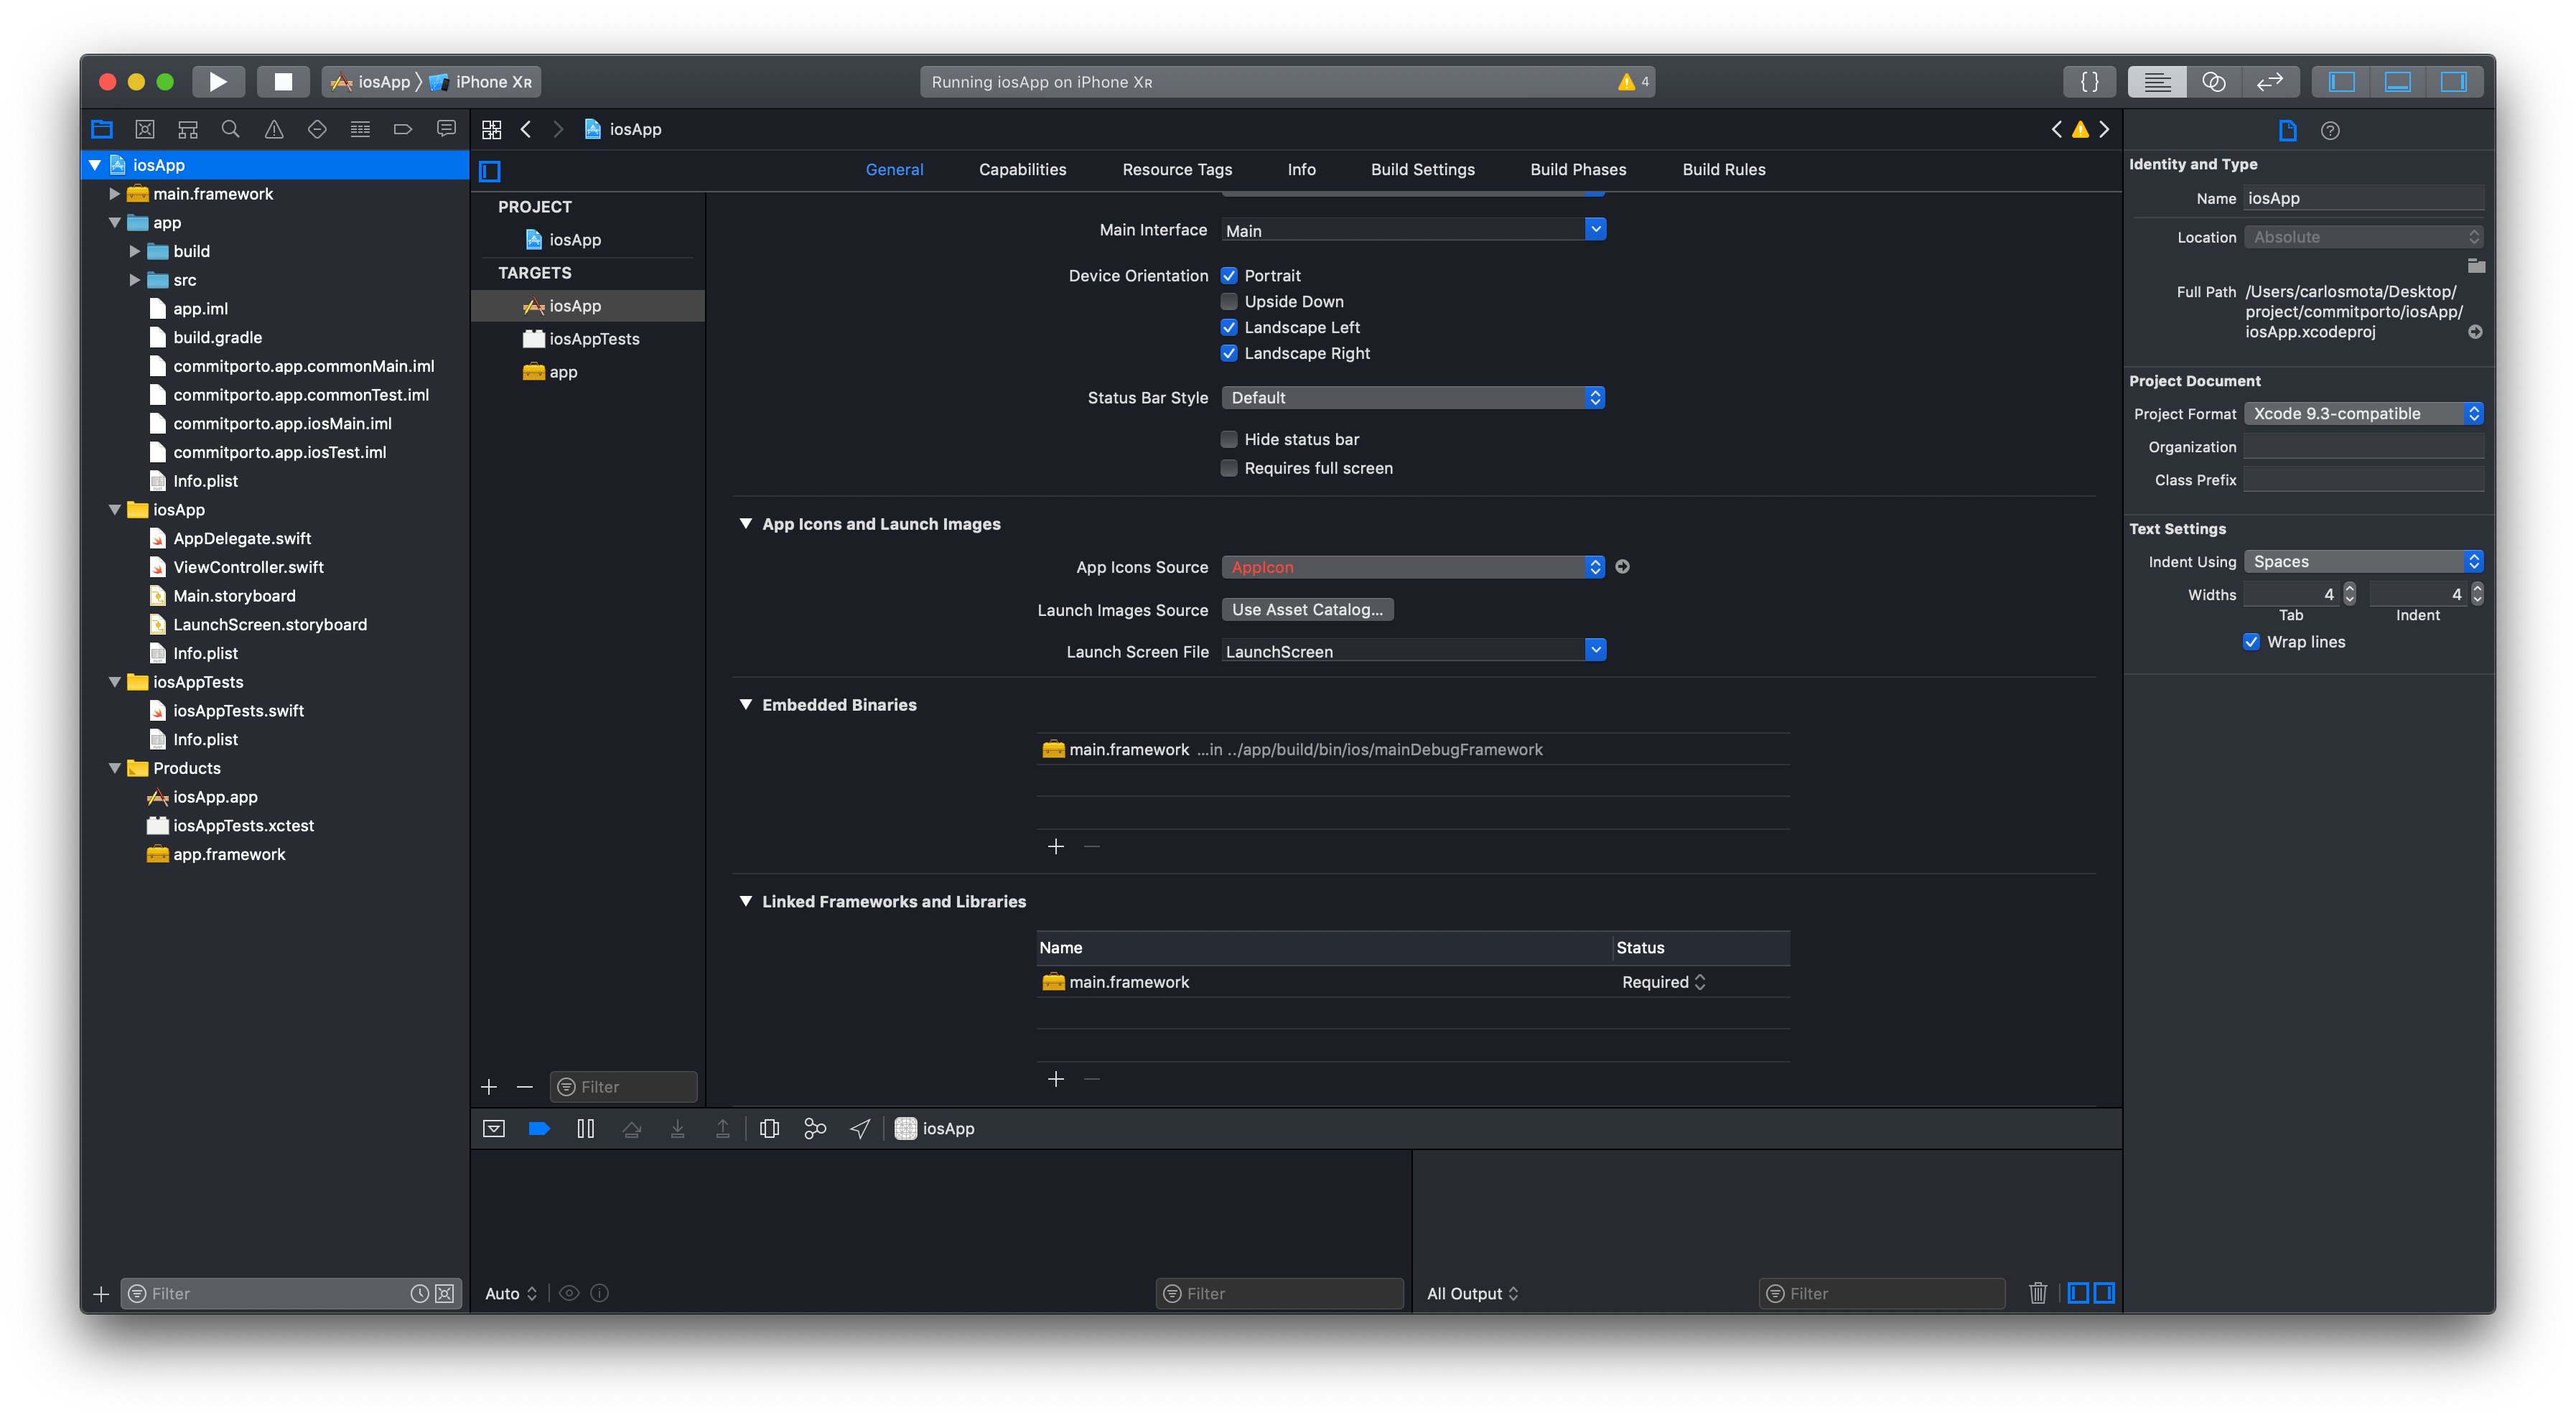
main.framework added to the project - Now click on the compile icon in the top bar and let’s wait for the simulator to load with our newly installed application.
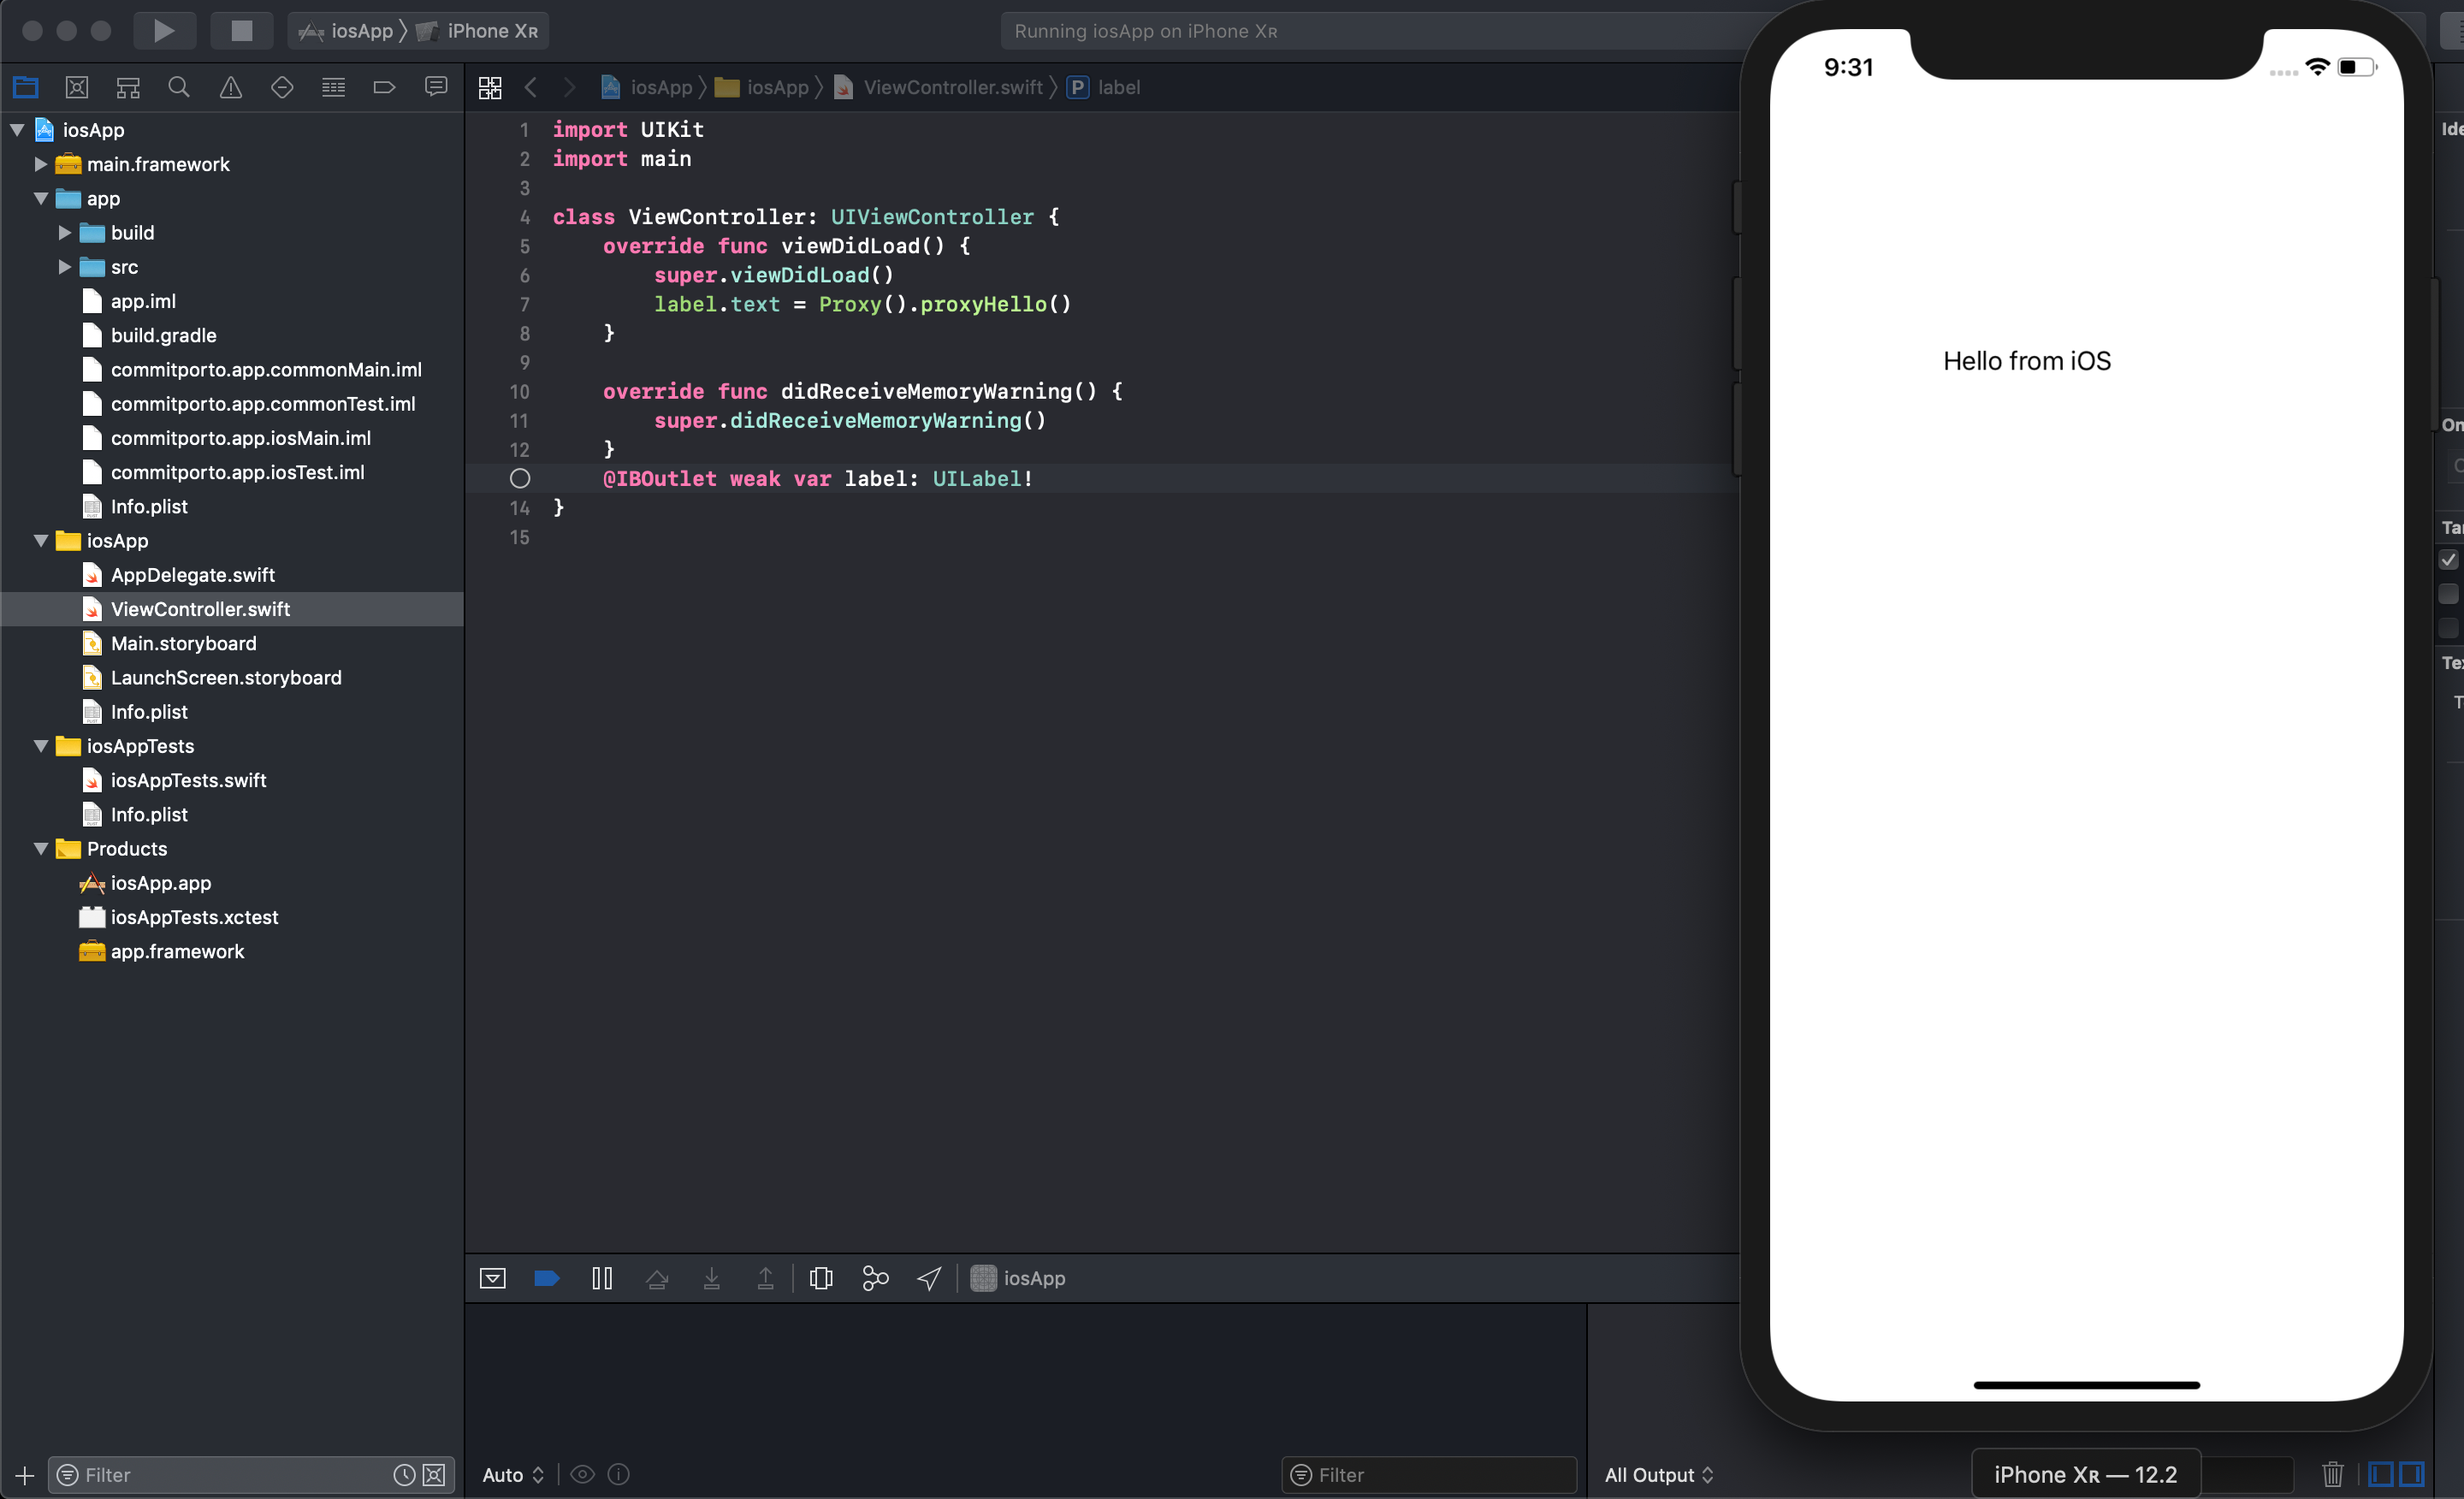
The iOS application running
For more information
JetBrains also has a tutorial on how you can set up a project for Android and iOS using Kotlin Multiplatform. Nevertheless, it has a couple more steps since they create a project directly from Android Studio.
Instead, I’ve decided to take part of IntelliJ new templates and create a project from there. This is particularly useful if you want to target more platforms since you can just add them as modules, which currently is not supported on Android Studio.
Do you have a better approach? Something didn’t quite work with you? Feel free to send me a message 🙂.